Apple Pie and Peanut Butter Cookies

My mom is a talented baker, so during her last visit, I figured it was a perfect time to learn something new, while also using the 1/2 peck of apples Whitney and I had picked up at Johnson's Orchards and making one of my favorite desserts - apple pie! The first step is to make the crust. This recipe is copied from Mom's ancient recipe card:

Plain Pastry
Single-crust pie:           Double-crust pie:
1 1/2 cups sifted flour     2 cups sifted flour
1/2 tsp. salt               1 tsp. salt
1/2 cup (3 oz.) shortening  2/3 cup shortening
4 to 5 tbs. water           5 to 7 tbs. water


Sift together flour and salt; cut in shortening until size of small peas. Sprinkle 1 tbs water over part of mixture. Gently toss with fork; push to side of bowl. Repeat until all is moistened. Form into ball. Flatten ball on lightly floured board. Roll from center to edge until dough is 1/8" thick.

The water part can be a bit challenging - too much and the dough is completely ruined, so add carefully and stop as soon as the dough holds together in a ball. When rolling the dough, always be sure there is enough flour under the dough to prevent it from sticking. Cracks are likely to appear - just repair them as they form. When ready to transfer to the pie dish, it can help to flour the dough, fold it in half, and transfer it quickly. The edge can be doubled over and decoratively crimped.

Making a pie crust with my new pastry cutter, rolling pin, and pie dish!

Mom brought along an apple pie recipe from a cookbook, but unfortunately I don't know which cookbook that is. Anyway, here's the recipe:

1/2 cup sugar
3 tablespoons flour
1/4 teaspoon ground nutmeg
1/4 teaspoon ground cinnamon
Dash of salt
5 cups thinly sliced apples (about 5 medium)

Mix sugar, flour, nutmeg, cinnamon, and salt, and set aside. Peel, core, and slice apples (this can be a lengthy process, so you can use lemon juice to keep the slices from browning). Stir into dry ingredients and turn into pastry-lined pie plate. Cover with topping. Cover crust edge with 3-inch strip of aluminum foil; remove foil during last 15 minutes of baking. Bake until crust is brown and juice begins to bubble through slits in crust, 40 to 50 minutes.

For this pie, I decided to top it with the crisp topping I love. This can be prepared simultaneously with the apples.

Making the filling and adding the topping...

Ready for the oven!

Don't forget to install your new car stereo while the pie bakes.

All done!

Once the pie was done, Mom made some yummy peanut butter cookies with the leftover Crisco, using the recipe from the Crisco package. I liked them enough that I figured I would link to the recipe.

Baked Mac & Cheese

I found myself browsing eatingwell.com for some fun fall recipes. I stumbled upon mac & cheese and decided I couldn't go too long without making it! It was delicious. I found it very similar to Sara Foster's mac & cheese that Patrick made a month or so ago. I'm sure this one is a bit healthier! This one also seemed a bit easier in prep but Patrick and I both prepped this one together which gave this one an "easy advantage". The eatingwell website recipe is hyperlinked in the title below. Be sure to check it out; there were lots of good user comments on the recipe.


Baked Mac & Cheese
4 servings | Active Time: 25 minutes Total Time: 55 minutes


*I'll include my notes along the way in blue!

Ingredients
3 tbsp dry breadcrumbs
1 tsp extra-virgin olive oil
1/4 tsp paprika
1 16-oz or 10-oz package frozen spinach, thawed > I used 10-oz
1 small-medium piece (~12-oz) of pre-cooked ham, diced in small pieces > This is my own addition to the recipe!
1 3/4 cups low-fat milk, divided > I used skim milk
3 tbsp all-purpose flour
2 cups shredded extra-sharp Cheddar cheese > I used the Mexican variety cheese pack; a few of the website comments mention using other cheese for more flavor so this is what I picked!
1 cup low-fat cottage cheese
1/8 tsp ground nutmeg
1/4 tsp salt
Freshly ground pepper, to taste
8 oz (2 cups) whole-wheat elbow macaroni, or penne > I used penne

Preparation
1. Put a large pot of water on to boil. Preheat oven to 450F. Coat an 8-inch-square (2-quart) baking dish with cooking spray.
Cheese sauce before pasta was added.
2. Mix breadcrumbs, oil, and paprika in a small bowl. Place spinach in a fine-mesh strainer and press out excess moisture. *Next time I would double the breadcrumbs mixture; there just wasn't enough! Also if you go to the grocery store immediately before making this you will obviously need to defrost your spinach in the microwave.
3. Heat 1 1/2 cups milk in a large heavy saucepan over medium-high heat until steaming. Whisk remaining 1/4 cup milk and flour in a small bowl until smooth; add to the hot milk and cook, whisking constantly until the sauce simmers and thickens, 2 to 3 minutes. *This took much longer than I thought it would; but be careful not to burn your milk!* Remove from heat and stir in Cheddar until melted. Stir in cottage cheese, nutmeg, salt, and pepper.
4. Cook pasta for 4 minutes, or until not quite tender. (It will continue to cook during baking.) Drain and add to the cheese sauce; mix well. Spread half the pasta mixture in the prepared baking dish. Spoon the spinach and ham on top. Top with the remaining pasta; sprinkle with the breadcrumb mixture. *One website comment suggested mixing the cheese sauce, pasta, and spinach/ham together. I preferred the layers but Patrick would've liked everything mixed together!

Patrick placing the spinach and ham.

Ready for the second layer of pasta.


Now with the pasta and breadcrumbs... to the oven!


5. Bake the casserole until bubbly and golden, 25 to 30 minutes.

Bubbly & golden! Let's eat!
Nutrition
Per serving: 576 calories; 22 g fat (11g sat, 2 g mono); 69 mg cholesterol; 63 g carbohydrates; 37 g protein; 9 g fiber; 917 mg sodium; 403 mg potassium.

Vitamin A (290% daily value), Calcium (70% dv), Folate (37% dv), Iron (15% dv).

Shrimp Scampi

The other evening Patrick requested a simple shrimp scampi. I try to figure out how to add extra vitamins and good stuff to my food so I knew a simple shrimp scampi was not good enough! Asparagus and roma tomatoes became the additions!

1 lb shrimp
1 bunch of asparagus, snapped in bite-sized pieces
3 roma tomatoes, seeded and cut in bite-sized pieces
small pasta
seasonings

The shrimp and veggies can all be sautéed while the pasta is boiling over a span of ten minutes. However preparation takes a bit of time. We shelled and deveined shrimp, snapped asparagus, and cut tomatoes for about 30-40 minutes. Taking the seeds (and extra juice) out of the tomatoes isn't necessary but will reduce extra liquid in the dish.

Add pasta to boiling water then heat up evoo and a little butter in a pan. I added my seasonings to the oil here so it would take on the flavor of the seasonings. Once heated add asparagus and sauté for 4-5 minutes. Then add shrimp; once shrimp are cooked and become pink add the tomatoes for the final few minutes. Toss with pasta and serve with parmesan cheese!
Simple and delicious!

Those Marinated Pork Tenderloins!

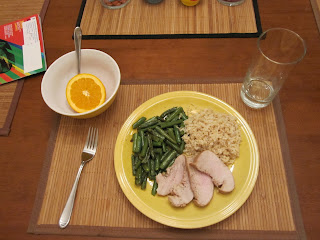
Interested in an easy, fast, and delicious meal? Then try a marinated pork tenderloin! Pick a flavor you like, a few veggies, and you're all set for a wonderful dinner. Not all of these blog posts are going to be recipes. I want to include fun, simple ideas for your dinner. For this meal we chose the Teriyaki flavored pork tenderloin, sautéed green beans, and (instant boil-in-a-bag) brown rice. 

For the green beans: Wash and snap beans. Heat evoo over medium high in a skillet then add green beans and seasonings. Sometimes when I do this I use some Mrs. Dash or salt and pepper. For this particular night I added minced garlic! Cook for 8-10 minutes or until the green beans turn a bright green and look like they want to jump from the pan into your mouth! Serve immediately.

Add an orange to your meal and fill your glass with milk and you've got all your food groups! I don't think this meal could've gotten any easier. Quick, easy, and inexpensive! And yummy!

Unfortunately we had soda :-(

Steak, Potatoes, and a Green

Fortunately Patrick is not a "meat and potatoes" type guy so I can experiment with fun variations on steak, potatoes, and a green. For this meal I served rib eyes, sweet potatoes, and broccoli.


For the steak: I began marinating it for about an hour but then, after reading directions on the Internet, realized  I should've just used a seasoning rub of salt and pepper. I heated up a cast iron skillet and then seared the steak on each side for 3-4 minutes. Some directions included placing the steak in the broiler to cook a little more which I did but not for long because my steaks were not very thick.

For the broccoli: This roasted broccoli recipe is an Ina Garten inspiration. Be careful of the recipe because it served six. It's very easy to cut down to two! Here's the broccoli before it went into the oven.

For the sweet potato: Very simple! Poke holes in the sweet potato with a fork all the way around the vegetable. Then put into the microwave. Use the potato setting and then check for desired tenderness. Probably takes 8-10 minutes.

Add some marshmallow fluff to that sweet potato and there's one happy Patrick!

Chicken Salad

There are probably an infinite number of chicken salad recipes. Typically I try to follow a recipe from Granny but I can never remember what she puts in it so each time I make chicken salad, it turns out differently. Granny's chicken salad is amazing though.

In my last blog post you'll recall that I used half of a rotisserie chicken and I'm sure you immediately began to wonder what happened to the other half! Well here it is... chicken salad! The flavor of the rotisserie chicken makes the salad top-notch. After browsing the internet for chicken salad inspiration I found some in the form of almonds! The salad was yummy and great for my lunches.

Celery & Almond Chicken Salad
1/2 rotisserie chicken, diced
2-3 celery stalks, diced
1/2 cup sliced almonds
desired amount of mayo
salt and pepper seasonings, to taste

Combine all ingredients together. Begin with a small amount of mayo and add until desired ratio for the salad. Enjoy!

Chicken Pot Pie

Patrick loves Chicken Pot Pie! I've never made Chicken Pot Pie! ... so I thought I'd try one day! I used a recipe from the Better Homes & Garden New Cook Book: Prizewinning Recipes (14th Edition). This time I followed the recipe as closely as I could. Patrick approved of the recipe and I really liked it. From the recipe I thought there were more veggies than a typical pot pie but everything turned out great.

Deep-Dish Chicken Pot Pie
Use the flavorful meat from a supermarket deli rotisserie chicken in this classic comfort food.


Prep: 50 minutes Bake: 30 minutes Oven: 400F Stand: 20 minutes Makes: 6 servings

1 recipe Pastry Topper > I used Pepperidge Farm Puff Pastry instead. Comment for the recipe & I'll happily pass it along!
1 cup chopped leek or onion > I used the onion   
Chopped celery, mushrooms, and onion
1 cup sliced fresh mushrooms
3/4 cup sliced celery (1 1/2 stalks)
1/2 cup chopped red sweet pepper > Omitted the pepper
2 tbsp butter or margarine
1/3 cup all-purpose flour
1 tsp poultry seasoning
1/4 tsp salt
1/4 tsp black pepper
1 1/2 cups chicken broth
1 cup half-and-half, light cream, or milk > I used skim milk
2 1/2 cups chopped cooked chicken > I used about half a rotisserie chicken
1 cup frozen peas and carrots > I could not find a bag of just peas and carrots so corn and green beans were also included!
1 egg, beaten

1. Prepare Pastry Topper; set aside. Or let your puff pastry thaw!
2. In a large saucepan cook leek/onion, mushrooms, celery, and sweet pepper in hot butter over medium heat for 4 to 5 minutes or until vegetables are tender. Stir in the flour, poultry seasoning, salt, and black pepper. Add broth and milk all at once. Cook and stir until thickened and bubbly. Stir in chicken and peas and carrots. Pour into a 2-quart rectangular baking dish.
3. Place pastry over chicken mixture in dish. Turn edges of pastry under; flute to edges of dish. Brush pastry with some of the egg.
Into the oven!
4. Bake, uncovered, in a 400F oven for 30 to 35 minutes or until crust is golden brown. Let stand for 20 minutes before serving.

Morphed Chicken Alfredo

This dinner surprised even me. What started out as a quick trip into the grocery to pick up chicken and alfredo sauce turned into a wonderful surprise recipe that I plan to try again. It's super easy and was under $10! Here's a little background into the morphing of the chicken alfredo and then the recipe.

Entering the grocery store two things were on my list: chicken breasts/tenderloins, alfredo sauce.
Upon entering the store I thought... hm I should get some green-y vegetables for a side, how about broccoli? While cooking I decided to add the broccoli directly to the pasta dish so I would only need one bowl for eating!
My first aisle stop was for the sauce. I compared alfredo sauces for sodium content and settled for Bertolli Four Cheese Rosa sauce which was the healthy winner!
My next stop was for the chicken! Before I found the chicken breasts I saw skinless, boneless chicken thighs. This was very tempting for me as I love dark meat and these thighs were skinless and boneless too! There was also double the amount of thighs as breasts so I could get two meals out of the thighs! This was a win-win choice! My first thought was to marinade the chicken and grill on the George Foreman grill but decided with another prep... read the recipe to what out how!
Finally I picked up my small frozen box of chopped broccoli and headed home!
(Pasta was waiting in the pantry!)

From pan to table to plate in no time!  
Morphed Chicken Alfredo
Serves 4

4-6 chicken thighs (or breasts/tenderloins)
1 small box of chopped broccoli spears
1 jar of alfredo sauce (as noted I used Bertoilli Four Cheese Rosa sauce)
pasta (I used one box of thin spaghetti)
seasonings (I used Mrs. Dash)

Preparation
1. Bring water to a boil for pasta.
2. Slice chicken into bite-sized pieces. While doing this trim off excess fat. Rub seasonings into chicken after cut.
3. Saute chicken in large pan with evoo.
4. Place pasta into boiling water and cooking according to directions. Add broccoli with the pasta two minutes before al dente. Then drain.
5. Once chicken is cooked, add pasta and broccoli into pan.
6. Add the jar of sauce and toss to coat pasta and chicken. Then serve!

Peach Crisp

Sara Foster's Fresh Every Day cookbook has a recipe for Pear Cranberry Crisp, but we decided to substitute peaches. We served it with vanilla ice cream. The crisp topping was very delicious. It's too bad we didn't get a picture of it, but here's the recipe.

Peach Crisp

Ingredients
5-6 peaches, peeled and sliced
Brown sugar
Vanilla

Preparation
1. Preheat oven to 375 and grease 9x9 baking dish.
2. Slice up 5 or 6 peaches, mix with brown sugar and vanilla, and spread over bottom of baking dish.
3. Sprinkle the Crisp Topping evenly over the fruit and bake the crisp on a center rack for 45 to 50 minutes, until the fruit is bubbling around the edges and the topping is golden brown. If the topping browns before the fruit is done, cover with foil and continue to bake until the fruit bubbles.

Crisp Topping

Ingredients
1/2 cup old-fashioned rolled oats
1/2 cup all-purpose or whole-wheat flour
4 tablespoons unsalted butter, softened
1/4 cup packed light brown sugar
1/4 cup chopped pecans
1 teaspoon pure vanilla extract
1/4 teaspoon salt

Put the oats, flour, brown sugar, butter, pecans, vanilla, and salt in a large bowl and work them together with your fingers until the topping is moist and crumbly. Don't over-mix; you want a few marble-size chunks of butter remaining. Use immediately, or store in an air-tight container and refrigerate for 1 week; freeze for up to 3 months.

Asian Steak and Noodles

I'm not usually crazy for steak, but on this particular night, I decided I was going to cook some anyway. However, not having a grill, I figured it would be much easier to chunk up the steak and cook it in a sort of stir-fry with noodles. I consulted a few stir-fry and hibachi steak recipes for inspiration, and ended up with this recipe. It turned out much more delicious than expected, and we didn't leave any leftovers.

Ingredients (serves two)
8 oz. steak (I used a top sirloin filet)
Marinade (I had leftover red wine/shallot marinade)
1 medium chopped onion
1 thinly sliced zucchini
1 package sliced mushrooms
Asian noodles (I used about 4 oz. wide lo mein noodles)
Soy sauce
Lemon juice
Butter

Preparation
1. Marinate steak. Don't skimp on marination time - I did maybe only 45 minutes, and the slightly dry steak was my only complaint with the finished product (although that may have just been the steak cut).
2. Cook noodles to not quite done and drain.
3. Sauté onion (I used a large non-stick frying pan, although a wok would have been better suited).
4. Add steak, along with some lemon, butter, and soy, and cook until almost done. Don't be afraid to let some marinade dribble into the pan - I think this may be partially responsible for how well mine turned out.
5. Add zucchini and mushrooms, mix with some more lemon/butter/soy, cook.
6. Add noodles and stir so they absorb the tasty juice. Cook to your satisfaction.

Two things at once? Magic!

All done!